
Requirements
- A Pancake account that is a member of the shop and has the configuration management permission (the owner or someone granted it).
- Node.js 22 or later (24 recommended).
- Basic Preact knowledge (or React for iframe pages). If you vibe-code, connect your AI tool to the MCP server as described in Build with AI, or point it at
/developers/apps/llms-full.txt.
1. Create a project
npx create-pos-app my-app
cd my-app
npm install
Default layout:
my-app/
├─ pos-app.json            # manifest: permissions, external domains, extensions
├─ extensions/             # code that runs in the worker (Worker UI or headless)
│  ├─ order-block.tsx
│  ├─ order-summary.ts
│  └─ report.tsx          # sample Worker UI page (Standard screens)
├─ page/                   # iframe page (optional), Vite + React
│  ├─ index.html
│  ├─ tsconfig.json        # separate TypeScript config for React
│  └─ src/main.tsx
├─ public/                 # images for pos-image (optional)
├─ AGENTS.md               # rules for AI tools, generated by the template
├─ eslint.config.js        # code rules, editors show problems as you type
├─ package.json
└─ tsconfig.json
The template declares these packages, installed by npm install:
@pancake-pos/ui-extensions: the SDK, with types for theposobject and thepos-*elements.@pancake-pos/ui: components named after thepos-*elements (PosPage,PosTable…),PosProvider, and the POS theme and tokens for iframe pages (Iframe page UI).@pancake-pos/app-cli: thepos-appcommand.@pancake-pos/eslint-plugin: code rules, shared withpos-app check.
Package details, TypeScript setup and the full CLI reference: SDK & CLI.
2. Declare extensions
Example: add a block to the order form and an item to the order action menu:
{
  "handle": "my-app",
  "name": "My app",
  "version": "0.1.0",
  "api_version": "2026-01",
  "access": { "methods": ["GET", "PUT"] },
  "extensions": [
    { "target": "order.details.block", "id": "order-block", "module": "extensions/order-block.tsx" },
    {
      "target": "order.details.action",
      "id": "push-erp",
      "label": "Push to ERP",
      "presentation": "headless",
      "module": "extensions/push-erp.ts"
    }
  ]
}
See every field in Manifest and every target in Extension points.
3. Try it inside POS
Connect the CLI to POS (once per computer):
npx @pancake-pos/app-cli loginThe browser opens the POS Connect CLI page: check that the code matches the one in the terminal, pick the shops (you need the Settings permission there) and click Allow. If you are not signed in to POS, the page signs you in first. Computers without a browser and CI use a manually created token (Manage apps › Connect the CLI).
Then run:
npm run dev # watch and build, serve at http://localhost:5174On the same management page, click Development mode and enter http://localhost:5174 (see Manage apps › Development mode). While it is on, POS loads the app from localhost in your browser only; everyone else in the shop keeps using the active version. When you edit code, POS reloads the extensions without reloading the page. Use Chrome or Edge: Safari may block an https page from loading http://localhost.
In development mode, pos.api can call the Open API only after the app has been uploaded at least once (npm run deploy, no activation needed), and it uses the access of the latest uploaded version. Deploy again after changing access. After each such deploy, reload the POS page so POS gets a new token.
Development mode runs against the real data of the open shop, so try a test shop first. To see the app as a staff member with narrow permissions, deploy and activate it on a test shop and sign in with that account.
While you write code, an editor with the ESLint extension shows problems as you type. Run npm run check to validate the manifest as well.
4. Build and upload
npm run deployThis command:
- Runs
pos-app check: validates the manifest and catches common code mistakes (see SDK & CLI). - Builds each module in
extensions/into a standalone ES module and buildspage/with Vite. - Runs final checks: valid targets, existing files, sizes within the limits.
- Uploads and creates a new version in the inactive state, then prints the version id.
5. Activate
On the Custom apps page, a shop admin:
- Clicks Versions on the app's row (for a new app: Review & activate), then Activate on the uploaded version.
- Reviews the data access (
access), external servers (network.allowed_origins) and placements the app requests, then clicks Activate. Users see the extensions on their next page load.
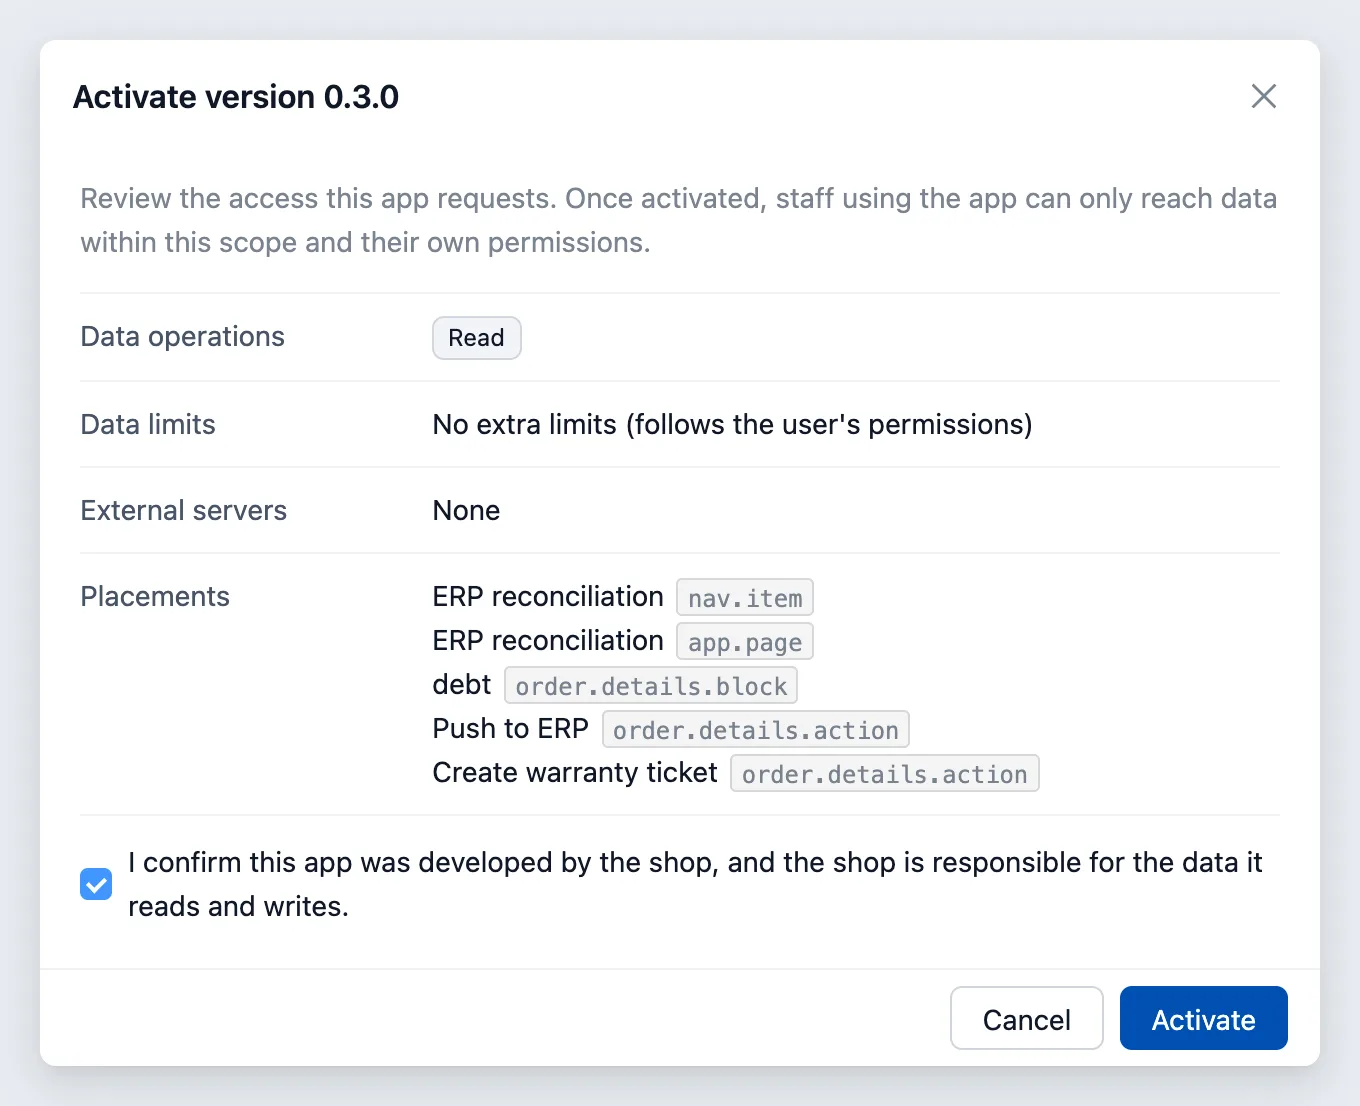
By default every shop member sees the app; limiting it by department is not yet available on the management page. Going back to an older version, turning the app off and reading the error log: Manage apps in POS.
Next steps
- Manage apps in POS: activate, turn on and off, read errors.
- Build with AI: the MCP server and sample prompts.
- Examples: a complete sample app.
- Runtime API: the
posobject. - UI components: the
pos-*elements.